MyNetgear Portal Login
Use MyNetgear account to manage your Netgear products using the Netgear Nighthawk app, Orbi app or Netgear Insight app. The same account can also be used to access MyNetgear portal login on a web browser using URL my.netgear.com.
Why Do I Need a MyNetgear Portal Login Account?
Creating a MyNetgear account lets you log in to your device with ease and also helps you register Netgear products, put in your queries onto the Netgear Community page, and do a lot more. You can receive important security and firmware updates, enable Anywhere Access to manage your network from anywhere using the same account.
To do all of this, you first need to create an account.
How to Create MyNetgear Account?
To create the MyNetgear portal login account, all you need to do is:
- Visit my.netgear.com on an updated internet browser.
- Navigate to the Create an Account page.
- Fill in the required details on the page.
- Enter first name, last name, email id, password.
- Thereafter, you will get a message to confirm your email ID and password.
Note:You can use these details as your MyNetgear login credentials.
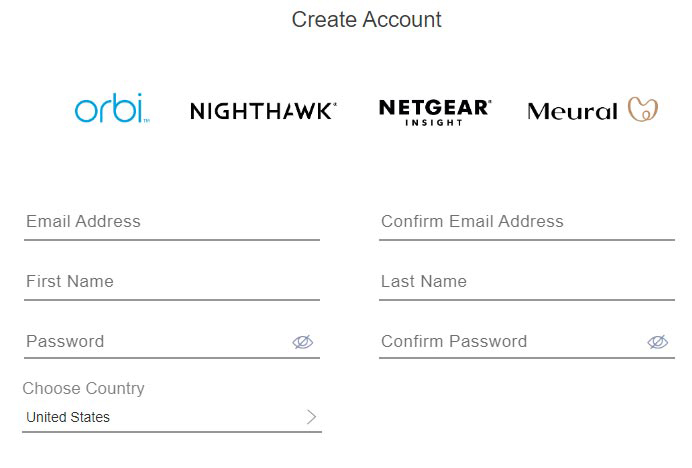
- Once done, select your country and click Continue.
- If you want to enable two-step verification, then select Yes, Enable. This is an added layer of security. Select No Thanks if do not want this option.
- If you’ve selected this option, then you will be prompted to enter your contact number. Type the number and click Add Phone Number.
- Enter the code that you’ve received on the same phone number in the given field and click Verify to verify the contact number.
- Finally click Finish to complete the process of creating MyNetgear portal login account.
That’s all! This is how you can create the MyNetgear account and make the most of your device. If you want to register your Netgear products then you can do it now. You can also post on Netgear community and now that you have created the account, you’ll begin receiving updates for your Netgear products.
Reset MyNetgear Portal Forgot Password
What if at any point in time you forget MyNetgear portal login password? In that scenario, you should reset the password. Here’s how you can reset MyNetgear portal forgot password.
- Visit my.netgear.com on a browser on your PC.
- Ensure a stable internet connection.
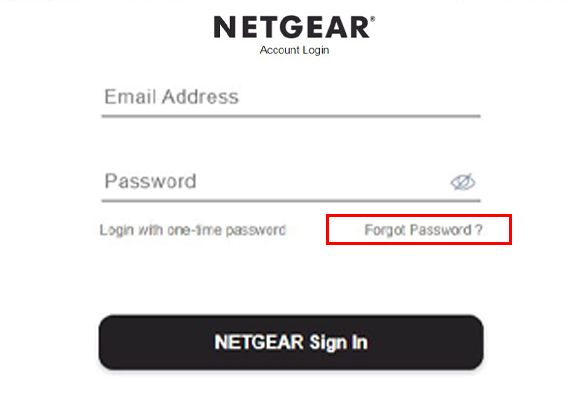
- Click Forgot Password? option.
- Input the email id that you use to log in to your account.
- Select reCAPTCHA checkbox.
- Next, click on Reset Password button.
- Head toward your inbox and copy the verification code that you received.
- Get back to the my.netgear.com tab and type the code in the given field.
- Enter the new password twice and click Submit.
MyNetgear.com password has been now reset. Make use of the new password to log in now.
How to Create MyNetgear DDNS Account on a Netgear Router?
DDNS (Dynamic Domain Name System service) updates IP address assigned to your domain name automatically. If the IP address of the host name changes, DDNS updates the DNS server at the same time. You ought to create a Netgear No-IP account to set up MyNetgear.com host name and utilize MyNetgear DDNS service.
The steps to set up your free DDNS account on a Netgear router are presented below:
- Get your computer connected to the router’s network first.
- Visit routerlogin.net on a web browser that’s updated to the latest version.
- Entering the admin username and password, log in to the router.
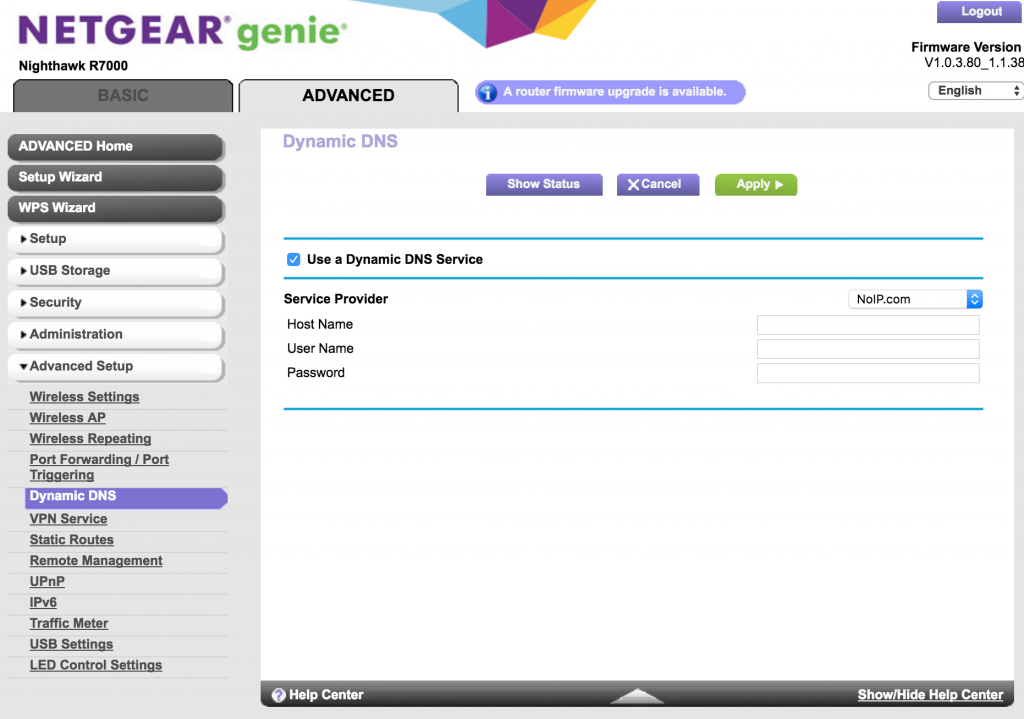
- On the BASIC home page, click ADVANCED.
- Next, select Advanced Setup and then Dynamic DNS.
- Click on Use a Dynamic DNS Service.
- Select NETGEAR in the service provider menu.
- Select No in Do you have a NETGEAR DDNS account section.
- Type the Host Name, Email and Password in the given fields.
Use mynetgear.com host name that you want in the Host name field.
- Click on Register.
- Click on the account activation link that you received in you inbox.
- You will be navigated to login page.
You have completed the MyNetgear DDNS account. Once you have created your free MyNetgear.com DDNS host name you ought to confirm your host name every 30 days or else it gets erased.
Yu have created a MyNetgear portal login account and also set up a Netgear DDNS account. Begin using the se account details to make the most out of your Netgear devices and services.
Why My Netgear Lights Blinking Red?
Many Netgear extender users approach us for having an answer to the question, ‘Why are my Netgear lights blinking red’. If you are also struggling with the same, then luckily you have stumbled upon the right page. Here, we’re going to list various reasons forcing your Netgear lights to blink red along with their possible solutions. Let’s get started!
Problem: If your home router is placed too far from the Netgear extender then it is obvious to struggle with the Netgear lights blinking red issue.
Solution: Relocate your extender and make sure it is within the range of your router. For locating your extender at the right place, you can get the help of MyNetgear manual.
Problem: Another reason that can force you to experience Netgear lights blinking red light issue could be related to WiFi interference.
Solution: Keeping your Netgear extender and home WiFi router away from things emitting radio waves can be of great help. To name a few, you can place your devices at distance from baby monitors, cordless phones, Bluetooth speakers, microwave ovens, refrigerators, etc.
Problem: Chances are your router and extender is not connected in a proper manner, which results in Netgear Lights blinking red issue.
Solution: Check the connectivity between both the devices and confirm if everything is fine. If an Ethernet cable is being used for connecting the devices, then make sure it has no cuts or breakage.
Problem: A technical glitch in your device can also end up with the red light issue on your Netgear extender.
Solution: For fixing the issue, power cycle your extender by unplugging its power socket from the power outlet. After a gap of a few minutes, you can plug in the socket back to its outlet and turn the power button on. Now, check the status of LED lights on your extender and see if the blinking red light issue has been fixed for you.
Problem: ‘My Netgear lights blinking red’ issue can also occur if your extender is not configured in a proper manner.
Solution: To get the issue fixed, reset your extender to the default settings and configure it again. If you are unaware of the process of resetting and reconfiguring your extender, consider getting support from our technical experts for quick assistance.
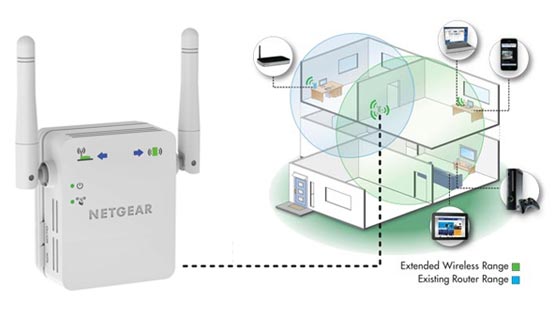
How Can I Access My Netgear Extender Login Page?
Another question that is in line by many Netgear extender users is ‘How can I access my Netgear extender login page’. If you are also looking for an answer to the same, here are the steps explaining things in detail:
- Power up your extender by plugging it into a power socket after you are done with connecting it to your home router.
- As soon as you find the LED light on your extender has turned green, get access to your computer.
- Launch a web browser of your choice and type mywifiext web address into the URL bar.
- Hitting the Enter key, you will find yourself on the Netgear extender login page.
- Fill in your login credentials and you’re done with the Netgear extender login process.
If you want to access the login page of your extender using the Nighthawk app, then first you need to create a MyNetgear account. Here’s is how to get the MyNetgear account creating job done.
Why My Netgear Showing Mywifiext Not Working Error?
Are you bothered by My Netgear showing mywifiext not working error? If yes, then we’ve got your back. Mywifiext not working issue can occur due to various reasons. A few of them are as follows:
- My Netgear showing mywifiext not working error will occur if the web browser that has been used by you for accessing the web address is not up-to-date or congested with the junk of cache and cookies.
- Typing errors in the web address can also be one of the reasons why you are facing mywifiext not working issue. Thus, cross-check the web address and make sure that you have entered it into the address bar of your browser.
- Probably, you have enabled Netgear Smart Connect but are using a different WiFi network name and password for both the 5 GHz bands. If so, then mywifiext not working issue will occur when you connect the extender with WiFi for one band.
- Closeness of your extender to interference-causing devices can also make you experience mywifiext not working issue. Thus, keep WiFi interference at bay and see if it helps you fix the issue.
- Check the power socket to which you have connected your extender. Perhaps, it is not working or providing sufficient power. If that is the case, either get the current power socket fixed or plug in the device to another wall outlet. Make sure the socket you use is offering a fluctuation-free power supply.
- Improper or partial extender setup can cause the mywifiext not working issue. So, reset your extender to the default settings and configure your device again. Once done, check if you still are troubled by ‘My Netgear showing mywifiext not working error’.
How Can I Reset My Netgear to Default Settings?
Want to know the answer to the question – ‘How can I reset my Netgear to default settings’? No matter whether you want to reset your device due to some technical issues or have forgotten its login password, the steps listed below will help you get success with the extender reset process without any hassle.
- Disconnect your extender from all the devices connected to it.
- However, make sure not to unplug the extender from its power socket.
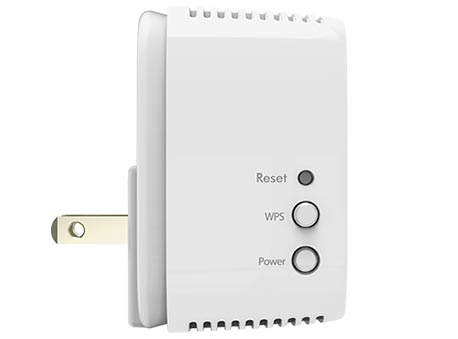
- Now, locate the Reset button on your device. The location of the button may vary from model to model. So, check all the sides of your extender to locate the button.
- Done? Press it using a pin-like device.
- Your extender will reboot.
- Once done, configure your extender from scratch to start using it.
We hope you have got an answer to your query ‘How can I reset my Netgear to default settings’. If something is not going in your favor or you are facing issues while taking your Netgear extender back to its default settings, then feel free to contact our technical experts and let them help you get success with the process.