Netgear EX6410 Setup [Introduction]
In case you are one of those people who is looking for the perfect solution to eliminate dead zones in his or her house, then you have come to the right guide. Here, we have particularly talked about one Netgear extender model, i.e. EX6410. The Netgear EX6410 wireless range extender, when connected to the router, extends the internet in every nook and cranny of the house without lessening the speed. To take advantage of this, you have got to perform Netgear EX6410 setup. Read the upcoming sections and get an understanding of how to execute the installation process along with other related topics.
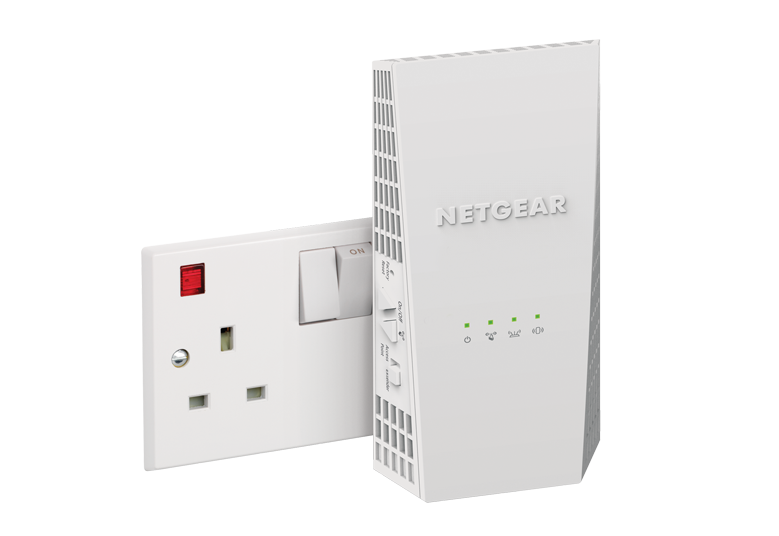
Netgear EX6410 Extender LED Meanings
This section talks about the status of LEDs located on your wireless range extender along with their respective meanings:
1. Click Link LED
This LED light indicates the connection between the Netgear EX6410 wireless extender and the device accessing its network.
Solid Red: Poor connection.
Solid Amber: Good connection.
Off: No connection.
Solid White: Best connection.
2. Power LED
Solid Green: The extender is getting an adequate power supply.
Solid Amber: EX6410 is booting.
Off: One has not pressed the power button.
Netgear EX6410 Setup via WiFi Protected Setup Method
The WPS method lets you access Netgear_ext of your Netgear EX6410 wireless extender without making use of the credentials of router. In this method, all you need to do is, press the WPS button located on the range extender.
For a detailed process, the following are the steps you need to read:
- Plug the EX6410 extender into the wall socket.
- Gently press the button named Power.
- Press the WPS button on the extender.
- In no time, the WPS LED will start blinking.
- Press the same button located on the router.
- After giving enough time to your device, change its location.
Make sure that the Netgear EX6410 extender is kept near the host router. This will ensure that a smooth flow of connection is happening between them.
Netgear EX6410 Extender Setup in Extender Mode
In order to set up your Netgear EX6410 range extender in extender mode, here are the easy guidelines that you need to take a walk through:
- Place the extender at its ideal location.
- Supply power to the device by plugging it into a wall socket and powering it on.
- Let the LED become stable.
- Gain access to your computer and fire up an updated internet browser.
- Enter mywifiext.net in the address bar and hit Enter.
- Soon the Netgear installation assistant displays.
- You will be asked to access the existing WiFi network.
- To learn how to do so, reach out to our well-versed technical experts.
- Unplug the range device and move it to a new location.
- Use the LED to choose a spot where the extender-to-router connection is optimal.
As soon as you are done completing Netgear EX6410 setup via mywifiext.net, consider accessing the network of the extender and enjoy a blazing-fast internet connection.
Setup Netgear EX6410 Extender in Access Point Mode
After following the guidelines below, you will be able to set up the Netgear EX6410 extender in the access point mode:
- Connect the extender to an electrical outlet.
- Wait for the power LED to become stable.
- To extend the network of your home network, connect the extender to the router.
- Use an Ethernet cable to do the honors.
- Open a computer and ensure that it is accessing Netgear_ext.
- Launch a web browser and make your way to the www.mywifiext.net web address.
- Make use of a cable to connect the extender to the router.
- Soon the Netgear Installation Assistant will come into view.
- Follow the on-screen prompts to install your extender in access point mode.
Although the aforementioned steps will help you to do Netgear EX6410 setup with ease, on the off chance, you come across any issues, ping our team of professionals.
How to Log in to the Netgear EX6410 Extender after Setup?
Right after you are done wrapping up the Netgear EX6410 setup process, the next step is to log into the device in order to view or change its settings. Here is how you can do so:
- Launch a browser on your device.
- Input mywifiext.local in case you are using a MAC device.
- Enter mywifiext.net or 192.168.1.250 for Windows.
- Press the Enter key.
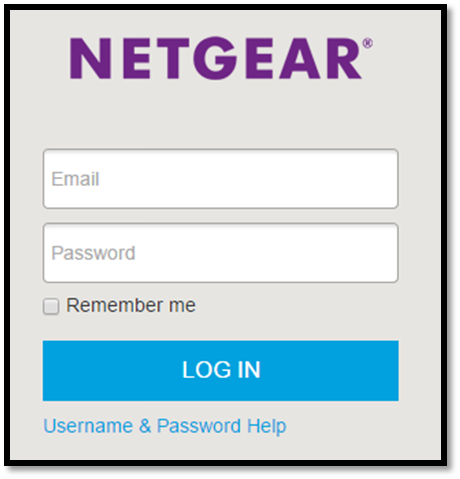
- You will find yourself on the Netgear EX6410 extender login page.
- Input the password and username of your device.
- Click on the Log In button.
- The Netgear EX6410 setup page will come into view.
- This is a sign that you successfully logged in to your device.
In case you want to know about the default login credentials of your Netgear EX6410, refer to the ones highlighted in the user manual of your networking device.
Before you can even blink an eye, you will be able to complete the Netgear EX6410 login process via 192.168.1.250 or the needed web addresses. In case of any doubts or queries regarding the same, you already know what to do.
For your information, there are two modes by which you can get in touch with our experts, i.e. via live chat or email. The choice is yours. Do not shy away from contacting them.