Netgear EX7300V2 Setup
Netgear AC2200 Nighthawk X4 WiFi mesh extender model EX7300V2 is known to boost existing WiFi speed and range. It helps to deliver a tri-band WiFi network. Create a whole-home WiFi mesh network by performing the Netgear EX7300V2 setup done with the existing router. At times, the existing router’s signals are unable to reach everywhere in the house. Installing an extender or mesh extender resolves this problem. After getting a Netgear WiFi extender setup done, you get boosted signals and full coverage even where signals were weak earlier. This web page will walk you through the amazing features of EX7300V2 and the process to set it up with the existing router in the home.
Netgear EX7300V2 Features
- Dual band WiFi up to 2200 Mbps
- MU-MIMO for simultaneous data streaming for multiple devices
- Smart roaming
- One WiFi name
- Uninterrupted 4K video streaming
- Single push button setup
- FastLane technology
- Works with the existing router
- Gigabit port helps to connect wired devices
Netgear EX7300V2 Setup
You can easily do the Netgear EX7300V2 setup with the existing router. As mentioned in the features, it is very simple to set up this extender using a single button on it. But we are going to provide you with three different ways using which you can carry on this task efficiently. You can use any one method as per your convenience.
Netgear EX7300V2 Setup: WPS Button
- Take your brand new Netgear AC2200 Nighthawk X4 WiFi mesh extender model EX7300V2 out of the box.
- Keep everything that you got in the box with care.
- Find a suitable place in the home that is near the existing router to place your extender.
- Done? Make sure there is a power socket available here. You may use an extension cord if needed.
- Plug the Netgear EX7300V2 power adapter into the wall socket and turn the power button on.
- What do you see? The LEDs flicker. You need to wait till these get settled.
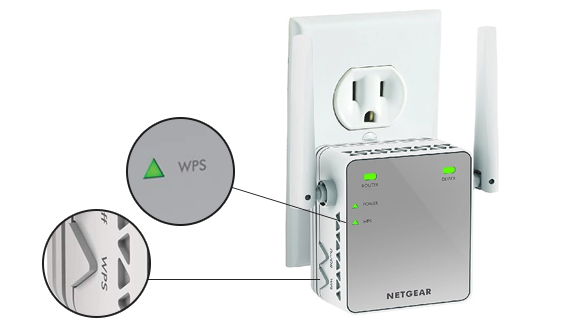
- Now, look for the button named WPS on it.
- Found it? Push it.
- Do the same with the router. That means push the WPS button on it.
There you go! You have performed Netgear EX7300V2 Setup with an easy one button push method. You wouldn’t agree anymore with us. The process is very simple and quick. But there is one condition here. The existing router should be WPA enabled. However, if it isn’t, then use the next method instead.
Manual Process
This method is known as the manual method or the web GUI method or mywifiext.net setup method. Here is the detailed process.
Steps 1 to 6 remain the same as the previous method. After that do this:
- Fetch an Ethernet cable and use it to form a connection between the Netgear EX7300V2 and the existing router. Make sure that you are not connecting the cable in a loose manner.
- After this, power on your PC.
- Load an internet browser on it.
- Input the login URL mywifiext.net in the URL bar.
- Push the Enter key on the keyboard after you are done entering the URL.
- This step will take you to the Netgear extender login page.
- Do you see two empty fields here? Type the login details in them. Use the default credentials if you have never changed them. Else use the changed ones.
- Clicking on the Log In button will navigate you to the mywifiext.net setup page.
- Thereafter, you just need to perform the instructions that are being displayed on your PC screen.
Netgear EX7300V2 setup is completed successfully using the manual method. Know that you can also use the default IP address 192.168.1.250.
No PC available? Don’t worry. A smartphone can also be used to go through this process. We are very sure that you have a smartphone with you. Detailed instructions to set up EX7300V2 using a mobile phone are provided in the next section.
Netgear EX7300V2 Setup: Nighthawk App
- After powering up the Netgear EX7300V2, wait till the LEDs are stable and the extender is powered up completely.
- Connect the extender to the router using an Ethernet cable. Make sure that the cable is in good condition and the connection that you make is firm. This is important to avoid getting stuck in any mess during the Netgear EX7300V2 setup.
- Now, take your mobile phone in your hand and unlock it.
- Go to the Google Play Store or the App Store.
- Search for the Netgear Nighthawk app.
- When the search results appear, tap on the correct app to download it.
- Immediately after the Nighthawk app is installed on your phone, tap on it to launch it.
- The first screen that will open up will be the login screen demanding you to input the login details.
- Enter the Netgear admin login credentials and tap on Log In.
- Once logged in, you will reach the Netgear Genie smart setup wizard.
- Once here, you simply need to follow all the prompts displayed on your mobile screen.
After you are done completing all the instructions, the Netgear EX7300V2 setup will be completed.
Need Further Assistance?
This way you can get the Netgear EX7300V2 setup done at your home. Now you can shift your extender to a new location. Place it at a location where you are experiencing weak WiFi signals. If you want to know how to choose the best place for your Netgear EX7300V2 to get the maximum WiIF range, contact our experts. They will give you the best advise. You can also, take their assistance if you are stuck somewhere during the setup process.