Netgear EX6400v3 Setup
Netgear EX6400v3 is an AC1900 WiFi mesh extender that can easily connect to your existing router to built a mesh network. It means, if you are comfortable, you can set up the range extender to work on the same WiFi settings as your router. However, for this, you have to enable a feature called One WiFi Name. Through this page, we will try to make you understand the Netgear EX6400v3 setup process using 192.168.1.250 IP, the Nighthawk app, and the WPS method.
Before You Set Up Netgear EX6400v3
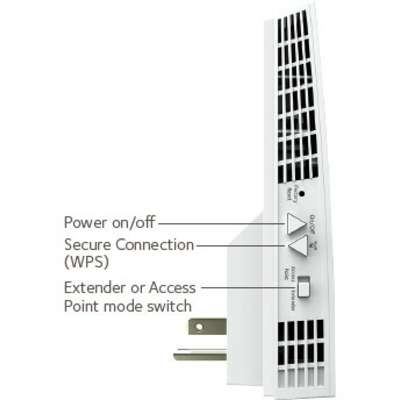
Prior to installing the range extender from Netgear, we want you to know that the EX6400v3 extender can work in the Access Point as well as the Extender mode. The normal operating mode is Extender and your device mode selector button must be toggled to the EXTENDER position before the setup process.
How to Complete Netgear EX6400v3 Setup?
| Using Nighthawk App | Via WPS Method |
|---|---|
| Switch on the EX6400v3 extender after placing it in the 8ft range of your main router. | Keep your WiFi extender in the same room as your main router. |
| Once the LED lights glow green, connect to Netgear_EXT on your phone. | Now, switch on the extender and let the LED lights gain stability. |
| Launch the Nighthawk app if you haven’t installed it yet. | Find the WPS button on the EX6400v3 extender and press it. |
| Create a Netgear account. You can also create an account if you are a new user. | The next step is to press the main router’s WPS button within 2 minutes. |
| Follow the instructions appearing on the screen to complete the setup process. | The Netgear EX6400v3 will be completed once the WPS light becomes stable. |
In this way, the extender can be installed with the help of the WPS method and the Nighthawk mobile app. However, if you fail to complete the setup, you should first of all go for Netgear WiFi extender reset and set up the extender using the Netgear Installation Assistant. The steps are given in the next section.
EX6400v3 Setup via Netgear Installation Assistant (192.168.1.250)
Follow the steps given below to understand the setup process via the manual method or the Netgear Installation Assistant. You will need the default SSID and WiFi password of the EX6400v3 extender for that. They can be noted down from the label of your extender.
- Switch on your Netgear extender followed by the router after placing both devices closer.
- Ensure that the Mode Selector switch is at the Extender position.
- Connect your PC to the Netgear_EXT (default EX6400v3) network.
- Open a web browser and access the default IP i.e. 192.168.1.250.
- After that, you will be prompted to agree to the Terms and Conditions.
- A network scan will happen where you need to select the network to be extended.
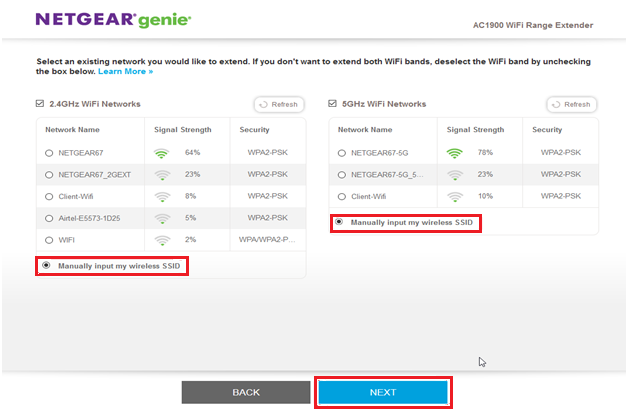
- Enter the WiFi password after selecting the network.
- Specify the WiFi network settings. You can also choose to keep the extender’s WiFi details as same as the main router.
- Save the changes.
- If prompted, assign an admin password.
- The wizard will finally show the settings and the Internet Status of your Netgear EX6400v3 extender.
- If the Internet Status is Connected, the setup process is completed.
This is how you can complete the Netgear EX6400v3 setup. If the IP does not work for you, use mywifiext.net. After that, you can move ahead to updating its firmware. Refer to the next section to learn how to install the latest version of firmware on the extender.
How to Update Netgear EX6400v3 Firmware?
The firmware is a utility embedded in the hardware of the extender that controls the overall functionality. If you do not update it, chances are that your extender won’t work perfectly. Here’s how to update the extender’s firmware:
- Launch an internet browser from the PC connected to your mesh extender.
- Go to mywifiext.net if you are using Windows PC.
- In case, you are using a Mac or Linux device, you should use the mywifiext.local IP address.
- When the login page displays, type in the correct login details of your EX6400v3 mesh WiFi extender.
- From the Menu, select Firmware Update.
- Select Check Online.
- If a new firmware version is available, you should follow the on-screen instructions to update the firmware.
How to Reset Ex6400v3 Mesh WiFi Extender?
In order to reset the mesh extender, the following instructions will be helpful for you. You can go for a factory reset if you are facing issues using the extender.
- Ensure that the extender is properly plugged in.
- Locate the Factory Reset button.
- Now, press the button using a paper clip or another sharp object.
- Release the button after 7 seconds.
- The mesh extender is reset.
Once the mesh extender resets to the default factory mode, you are suggested to go through the setup instructions once again and make your device up and running.