Netgear WN3000RPv2 Setup
The WN3000RPv2 extender is a universal Netgear WiFi range extender. It means, the extender boosts the internet range of all kinds of routers. You can fetch a maximum of 300Mbps speed from this very range extender. It has a unique design makes it a plug-and-play device. You can easily install it using the default IP. The process is very similar to performing Netgear N300 setup for other models belonging to the same family. Read the section below to know about the complete installation of the extender.
WN3000RPv2 Extender Setup Using WPS
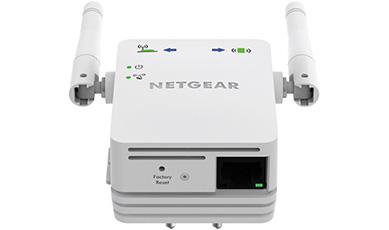
The provision of the WPS button on the range extender can assist you to set up the extender in a matter of minutes. But, you can only use this method if the host router is also WPS-authorized. To set up the Netgear WN3000RPv2 extender using WPS, you just have to press its WPS button (present on the side panel). The same button needs to be pressed on the main WiFi router. Remember that if you press the router’s WPS button after 2 minutes of doing it on the extender, the setup process might fail. Also, log in to your router and look for its WPS settings if it does not have a physical WPS button.
How to Set Up WN3000RPv2 via Smart Setup Wizard?
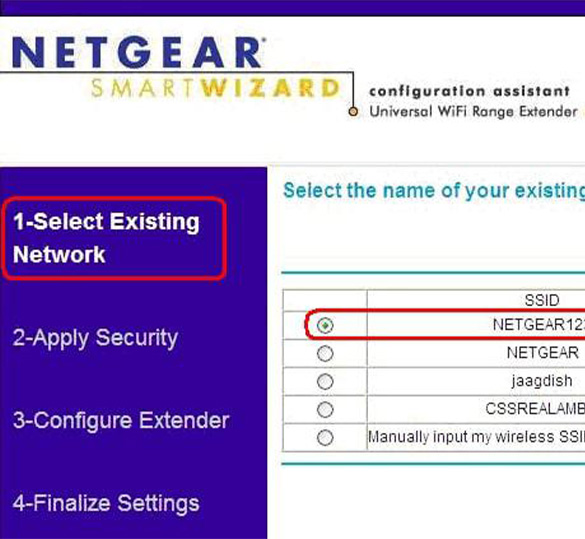
If you wish to make your extender up and running using the Genie Smart setup wizard, you will have to access 192.168.1.250. FYI, it is the default IP of a majority of Netgear extenders including your Netgear WN3000RPv2 N300 extender. We are highlighting the setup steps below. But, before that, ensure to keep your extender and the main WiFi router in the same room.
- Switch on your computer after switching on the N300 extender and router.
- Open WiFi Manager and find the network named Netgear_ext.
- Connect to it using the default WiFi password of WN3000RPv2.
- Load an internet browser now and type the extender’s IP into the URL field.
- Press Enter to see the login page of your extender.
- Enter the default login details and let the extender scan the available WiFi networks.
- Check the list properly and see if it has the SSID of your router.
- If yes, then connect to it using the router’s WiFi password.
- The Router link LED on your Netgear WN3000RPv2 will turn green.
- Router and extender connection is successful!
- Walk through the instructions appearing in the screen to complete the rest of the process.
Don’t know the default network password? You should check the product label. If we talk about the admin information of the WN3000RPv2 extender, you should type “admin” into and “password” into the Username and Password field respectively. Both the values are case-sensitive.
After you are done extending the network of your main router, you should change the network name from Netgear_ext to something else so that you can easily identify the extender’s SSID. In the end, you are also suggested to assign a different WiFi password (it shouldn’t match the login password) to the extender.
Resetting the WN3000RPv2 WiFi Extender
The extender should be reset if you are unhappy with its WiFi performance or it is behaving weirdly. You can also go for the reset approach if the extender isn’t connecting to the router after multiple attempts. The reset process can be completed using the steps given below:
- Disconnect all devices connected to the Netgear WN3000RPv2 extender.
- Find the Factory Reset button.
- It is present at the bottom of the extender.
- Using a sharp object, press and hold the button.
- Keep the button pressed for 15 seconds.
- Your extender will reset!
Note: You have to complete Netgear WN3000RPv2 setup once again after resetting it. The reason being, resetting will erase all the settings given by you including the admin username and password.
Netgear Extender Firmware Update
Your WiFi extender will work all well if you update the firmware on timely basis. It also improves the security of home WiFi. You are supposed to go to mywifiext.net from a computer connected to the extender in order to update the firmware. Here’s how:
- Launch a web browser on your computer.
- Log in to the extender using the valid details.
- Click Maintenance > Firmware Upgrade.
- Select Check.
- Follow the on-screen instructions.
WiFi Extender WN3000RPv2 Manual
Just as Netgear range extender models do, this very extender model also has a user manual that consists of every piece of information related to the product. There you will find out that mywifiext.local is also the login URL of a Netgear extender that works on Mac only. Apart from this, default admin and WiFi details are also given there. If you go through the Netgear WN3000RPv2 manual carefully, you will find out that it also has short sections that describe how to carry out various operations related to the extender and devices connected to its network.