I have bought a Netgear M4250 switch and I am trying to set it up. On the login page, I typed admin as username and left the password field blank. I read in the user manual that when it is first time login, the password field is to be left blank. But when I am trying to log in, it says incorrect username/password. I get lockout every time- Netgear M4250 switch user.
Is the default password not working for you as well? Do you want to know how to get this issue resolved so that you can set up the Netgear AV switch? Well, in such a scenario you will have to give this blog post a thorough read.
How to Fix Netgear M4250 Switch Setup Issues?
So, you are trying to configure your Netgear AV Line switch using the default password, but can’t complete the setup. This can happen if:
- The switch is not running on the default values. Perhaps someone else has assigned a value to its password. Or maybe due to multiple setup trials, there are some configurations on it that are not letting the default password log you in.
- The browser that you are using is not compatible or the accumulated cache is stopping the login.
- Another possibility is that you are not following the right procedure to complete the setup and login.
What You Should Do Now?
Now that you have the possible reasons in front of you, allow us to eliminate the hindrance to the Netgear M4250 login and setup process.
1st Step: Reset Netgear M4250 Switch
The very first step is to reset the switch. We understand this is a newly purchased switch and runs on the factory settings. But let’s reset it once again and rule out any possibility of not having the default values on it. So, factory reset your switch now:
- Initially, power down the switch using the Power button.
- Wait for about 2 minutes and then power it up toggling the Power button.
- Let the switch boot up completely. The Power LED should turn solid green.
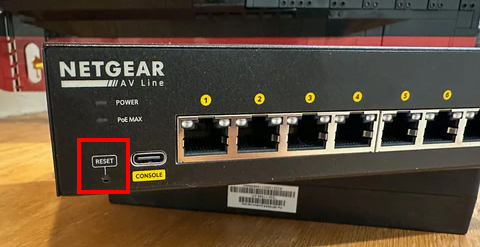
- Now, look for the Reset pin hole on it. You’ll find it to the left of the OOB port.
- Upon locating it, use a pointed object and press it for about 10 seconds. The Power LED turns amber.
- Release the Reset button and let the LED turn solid green again.
The switch is now running on the factory defaults and is ready to be set up.
2nd Step: Get Your Browser Setup Ready
Using a supported browser is suggested. Try using different browsers to complete the setup task. Besides, update it to the latest version and also clean its cache, cookies and browsing history. Now, your browser is ready to set up your Netgear AV switch.
3rd Step: Set Up Netgear M4250 Switch
You can now set up the Netgear switch. But ensure to use the correct steps. We have discussed the instructions for the same ahead.
You can configure the switch using the audio-video local browser user interface (AV UI), main local browser user interface (Main UI) or Command Line Interface (CLI).
i) Using AV UI or Main UI
Use a PC on the same subnet as the Netgear M4250 switch to reach the desired UI using the default IP address. Here are the steps for the same:
- Set up a static IP on your PC.
- Use an IP address in the subnet 169.254.0.0 with subnet mask 255.255.0.0 to access UI over the Ethernet network port.
- In the event, you are using OOB port; use IP in 192.168.1.1 subnet with subnet mask 255.255.255.0.
- It is now time you run an Ethernet cable from the OOB (Out of Band) port/Ethernet Port on the switch to the Ethernet port on your PC.
- Run the browser that you updated and made ready for setup.
- Insert the default IP of the Netgear AV switch in the URL bar.
- Use 192.168.0.239 if using the OOB port. And use the default IP 169.254.100.100 if using the Ethernet port.
- Upon hitting the Enter key, the login page will come to view.
- AV UI Login- Type admin in username field and leave the password field blank and click on AV UI Login button.
- Main UI Login- Click on Main UI Login button and then enter admin in the username field and leave the password field blank.
- Assign a password and save it.
- Next, use the assigned password to log in again.
- Follow the instructions and set up your switch.
ii) Using CLI
You should connect your PC to one of the console ports on the switch to use CLI for the configuration process and assign a static or dynamic IP address.
- Connect the right cable to join the computer and switch. Both cables are provided in the package.
- Use a Console cable if the connector type on PC is Type-C USB console port. Use a Console cable if the connecter type is RJ-45 RS232 console port.
- If you are using Console port on the switch, then you need to use a terminal emulation program.
- Use HyperTerminal or Tera Term on Windows PC, use ZTerm on Mac OS and use Minicom on Linux OS.
- Log in using the username as admin and leave the password field blank.
- Assign a login password and log in using the same.
- Carry out the steps that the prompts suggest and complete the Netgear AV switch setup using CLI.
Let’s Wrap it Up
We are anticipating that after performing the reset and using the correct Netgear M4250 switch setup instructions, you have completed the configuration process with ease. The default password for the switch shouldn’t stop you from carrying out the setup process. Register your Netgear switch to the MyNetgear account and begin receiving firmware updates and security updates for your AV Line managed switches. You can also post on the Netgear community to get any assistance.
