This guide discusses the process to install the Netgear WAX202 access point. Considering you are reading this blog post, it means that you have been lurking around the web to learn how to execute the Netgear access point setup process. Read the instructions mentioned below and get an understanding of how you can go about it in a hassle-free manner.
How to Execute Netgear WAX202 Setup Process?
1. Unpack the Netgear WAX202
Start the process by unpacking the Netgear WAX202 WiFi access point. Along with it, you will also find a DC power adapter, an Ethernet cable, an installation guide, and much more. Make sure that you are unpacking the content with care. If even one of the accessories gets damaged, you will not be able to complete the setup process. Forget about that, you will also come across other technical issues in the future.
2. Connect the Netgear WAX202
The next step in line is to unplug the router of the broadband, DSL device, and cable. But, it is recommended that you leave the device which is connected to the wall jack belonging to your internet service. For your information, in case the device which you are using uses a battery, then take our advice, and remove it. Once done, you need access an Ethernet cable.
3. Plug in the Ethernet Cable Now
To the yellow WAN port on the WAX202, connect one end of the Ethernet cable. Once done, connect the second port of the cable to the LAN port of the DSL device also known as the broadband. In case the DSL device uses a battery backup, put the battery back in. As soon as you have taken care of this, plug in as well as turn on the device. Soon, power on the WAX202 access point and ensure that all the lights have become solid on it.
4. Join to WAX202 WiFi Network
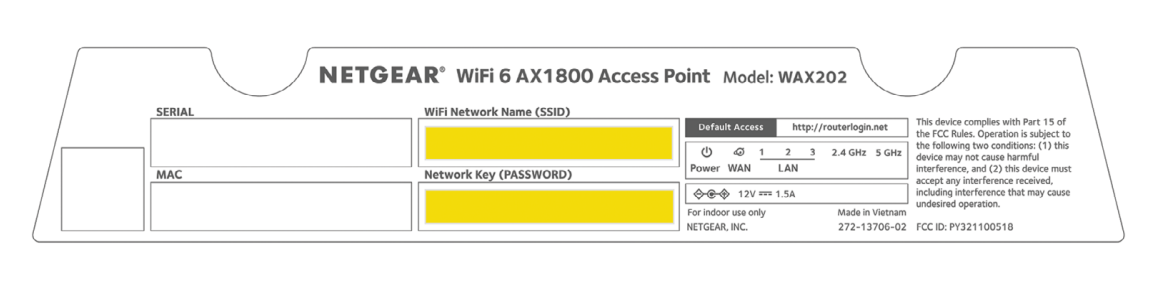
Switch on your WiFi-enabled laptop that you are keen on connecting to the WAX202 AP. Go to the WiFi utility, and let it scan for all the available networks. Find the name of WAX202 and enter the password. You should know that the WiFi name as well as the password will be found on the label of the AP. Do you not believe us? Refer to the image given here.
5. Log in to the WAX202 Access
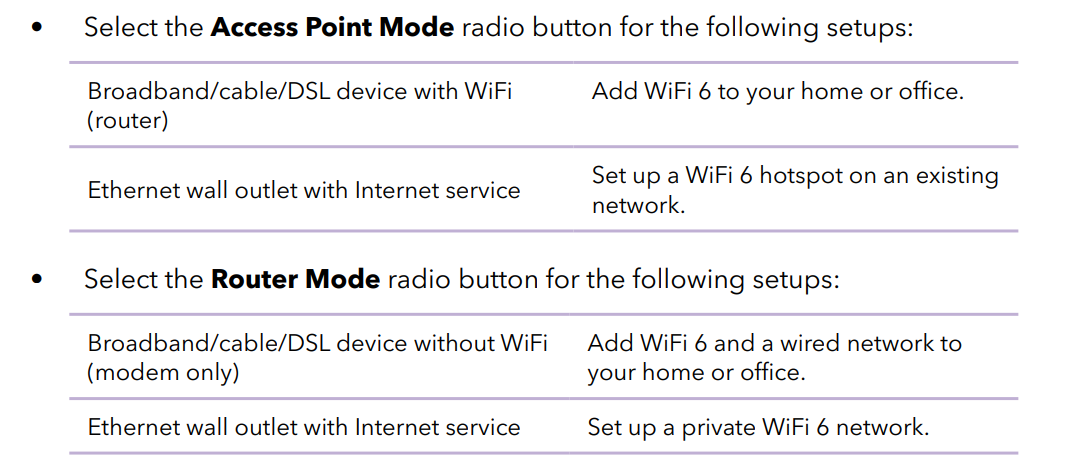
The Setup Wizard will start automatically. Now, you are required to set up WAX202 in one of these modes: Access Point Mode or Router Mode. As soon as you are done with the same, set a new admin password for login and then, set the security questions as well as answers. Done with this too? Good. Now, you may set up a new network name or SSID and even the password or network key.
Once you have configured WAX202 AP in one of the above-mentioned modes, check whether a new firmware version is available. Is it? Well then, it is suggested that you walk through the on-screen prompts to update the firmware of your access point with ease. Soon WAX202 will reboot itself. Avoid closing the window of the browser that you are using before the process completes. It will not end well for you otherwise.
Facing Issue Once Done with Netgear WAX202 Setup?
Many users get stuck with technical issues right after they complete setting up the WAX202 WiFi access point. In case you are amongst the lot, it is recommended that you locate the Reset hole. Whenever you access it, press the button located inside the hold. You ought to do this with the help of a pointy object. To be specific, you need to put a paper clip, that too a straightened one into the opening.
Keep pressing the button named reset for 10 seconds. The LED light will soon start blinking amber. This is a sign that the configuration is reset to the factory default settings. Now, your AP will start rebooting. This process can take 2 minutes to get completed.
Although this is the easiest method to reset AP, in case you found it difficult, it is suggested that you restore the networking device using the manual method. To learn how the process can be executed, it is recommended that you go through the steps given in the manual.
Conclusion
This concludes the blog post discussing the Netgear WAX202 setup process. Here is to hope that you will be able to finish the configuration process with the instructions given above. Are you interested in becoming aware of similar topics in the future? Is that a yes we see? Well, do bookmark this website.
The reason being, here, you will find something or the other new to learn. This means that whenever you feel like feeding your brain with knowledge, you are aware of where to go.
