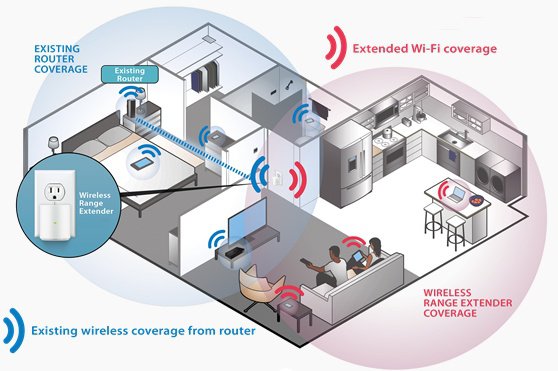
WiFi range extenders are not new products in the market. Millions install them in their houses so that they can have enhanced WiFi coverage. However, you cannot expect your extender to provide you with an internet connection if it is not linked to the router in the first place. You must know that the router serves as an internet source for the range extender. This blog is written to educate users who want to install Netgear WiFi extenders in their houses by connecting them to the router/gateway provided by Starlink. We would like to start with the steps to connect WiFi extender to Starlink router.
How to Connect WiFi Extender to Starlink Router?
This is to inform you that you can adopt two approaches to connect your WiFi extender to the router brought in by Starlink. You can connect both devices either with the help of an Ethernet cable and access 192.168.1.250 to proceed further or use the WPS approach so that they can connect within a single push of buttons. The table given below will help you understand the concept better.
| S. No. | Wired Connection | Wireless Connection |
|---|---|---|
| 1 | Place the Starlink router and extender in the same room. | Switch off your WiFi router (if it is currently working). |
| 2 | Connect them using a LAN cable. | Bring your Netgear extender closer to the router. |
| 3 | Now, switch on the router and Netgear extender. | Switch on the Starlink router now. |
| 4 | Once the lights on them stabilize, connect your PC to Netgear_ext. | Power up the Netgear extender. |
| 5 | Access 192.168.1.250 or visit mywifiext.net. | Now, locate the WPS button on your extender and press it. |
| 6 | Choose the setup mode. | Press the router’s WPS button. |
| 7 | Select the network name that belongs to your Starlink router. | Once the 2.4 GHz LED on the extender lights up, press the WPS button again. |
| 8 | Input the Starlink WiFi password. | Push the WPS button on the router for the second time. |
| 9 | Hit Connect. | Let the 5 GHz LED light glow. |
| 10 | Follow on-screen prompts. | You’ve successfully connected your WiFi extender to Starlink router. |
| 11 | The connection is successful! | Connect your WiFi clients to the extender’s network. |
In this manner, you can use a wired or wireless approach to connect your WiFi extender to the Starlink router. However, after following the on-screen prompts on the extender’s dashboard and after finalizing the WPS connection, you are supposed to relocate the extender. This is done so that the signals emitted by the extender will be able to reach the farthest places in your house. And yes, you can disconnect the Ethernet cable connecting your extender and router after the relocation process. As far as the extender’s management process is concerned, you can use the MyNetgear portal for that.
Important Point: While you relocate your WiFi range extender after connecting it to the Starlink router, you are not supposed to keep it too far. If you violate this rule, the router won’t be able to feed WiFi signals to the extender and hence all your efforts will fail. Thus, mind the distance between both devices. You can keep it in between 8-10 ft.
Can’t Connect WiFi Extender to Starlink Router?
There is a slight possibility that you will fail to connect your Netgear range extender to the main router. To resolve the problem, we have provided some troubleshooting techniques that can help you a lot.
| S. No. | Troubleshooting Wired Connection | Troubleshooting Wireless Connection |
|---|---|---|
| 1 | The wired connection makes use of an Ethernet cable. Therefore, if you are not successful in connecting your extender to the router, you should check the cable. It must not be worn out. Go with a new Ethernet cable in case the cable is not up to the mark. | You must be very sure that you are not placing your devices too far. However, keeping them close is also not suggested. Both situations can stop the WiFi extender to router connection. Also, remove physical obstructions from the path of communication of both devices. |
| 2 | Ensure that you are entering the correct WiFi password of the Starlink WiFi router on the BASIC Home screen of the Netgear extender. The WiFi password is case-sensitive and is very much different from the admin password. | Press the WPS button on the router within 2 minutes of pressing the button on the router. Many users fail to connect their devices because they do not press the WPS button on the second device within a particular time frame. |
Aside from considering the aforementioned things, you need to know that if you are using a browser-based method on a Mac device to connect your Netgear WiFi extender to Starlink router, you should use mywifiext.local instead of mywifiext.net. This web address particularly works for iOS devices.
Epilogue
You can easily connect your Netgear WiFi extender to Starlink router if you take care of the factors involved in the process. Once you are done connecting your networking hardware, you can connect your wireless clients to the extended network, Netgear_ext. But, you must know that the aforementioned instructions will only be fruitful if your extender is running on the default factory settings. You cannot connect an already configured WiFi range extender to the Starlink WiFi router.
