Looking to install a Netgear WiFi range extender in your home to extend the existing network range? This is not at all a daunting task you know. You can get it done all by yourself without any technical expertise. Netgear Wireless range extender comes installed with an in-built program that helps to complete the installation process with ease. This post will help you complete the range extender setup with Netgear installation assistant, the in-built program. Let’s begin.
Netgear Range Extender Setup with Netgear Installation Assistant
If you just bought a Netgear wireless extender, then the very first thing that you ought to do is to connect it to the host router in your home and complete the Netgear WiFi extender setup. Even if you have reset your existing extender to factory default, you’ll need to complete its installation once again from the very beginning. All of this can be done using Netgear Installation Assistant that will help you complete the setup just by following the prompts that you see on the screen.
Do This Before You Begin!!
- Place the Netgear WiFi extender close to the host router in the home. Placing them in proximity is required during the connection process. Once the setup is completed, you can shift the extender.
- The next step is to use an Ethernet cable and use it to join the LAN port of the router to the Internet port of the extender. Ensure using the correct ports and make a firm connection. You can choose to let the devices connect wirelessly.
- Finally, power up the main router. After that power up the Netgear extender. See to it that you’re following the same sequence.
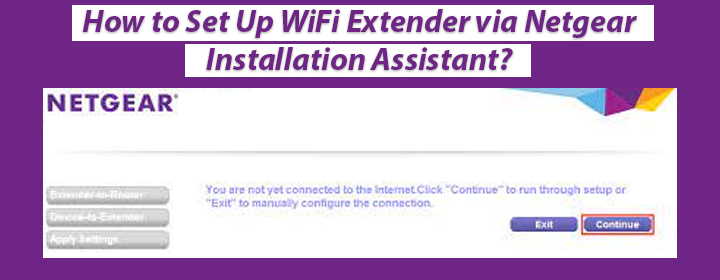
Let the devices boot up completely and then proceed further to complete the setup. When it is the first time setup, the login URL mywifiext.net or default IP takes you to the installation assistant directly. Use the steps given ahead.
Let’s Connect with Netgear Installation Assistant!!
- Get your computer, laptop or mobile device connected with the Netgear extender’s WiFi.
- Connect to the extender’s default SSID Netgear_Ext on your PC or phone.
- You can also make a LAN connection between your PC and the extender’s network.
- Open an internet browser now. You’ll see Netgear Installation Assistant appearing on the browser.
- If this does not open by default on connecting to the extender’s network then visit mywifiext.net to get to the same. You can also use the IP 192.168.1.250.
- Keep on executing the prompts that you see on the screen now to complete the setup.
- This will connect your extender with the router’s network.
Netgear Extender Setup is Done! What’s Next?
After you’ve set up your Netgear WiFi extender, you need to shift it to a new location where you want to connect to the extended network. Do this now:
- Unplug the Netgear range extender from its current power outlet.
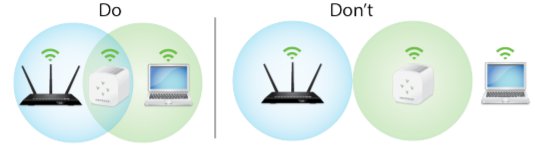
- Choose a new location that’s halfway between the main router and areas with no WiFi from the router.
- The place that you choose must be within the range of the router.
- Plug in the extender into an available wall outlet and turn it on using the Power button. Let the Power LED on it turn green.
- The Router LED on the extender will help you select the correct spot to place it. This indicates router-extender connection status.
- The LED turns amber or green if the connection between the two devices is optimum.
- Move the extender accordingly. Move it closer to the router till you see the LED lit in amber or green color.
After you’ve placed the Netgear WiFi extender, connect your computer or mobile phone to its network and check the network connection. You should also register your WiFi extender to your MyNetgear account now. Doing this will help you receive updates and notifications for your device. You can also post on the Netgear community using the MyNetgear account details in case you need any assistance related to your Netgear product.
Let’s Wrap It Up
This blog post helped you learn how to complete the set up of your Netgear WiFi extender using the Netgear Installation Assistant. This process requires you to connect to the extender’s network and then follow the setup instructions. Once the set up is completed, you can shift the extender and connect to its network and enjoy the extended network.
